Friday, April 15, 2011

Non-Traditional Sandbox Design 10

21: Create basic map of towns/villages

Next I create a basic layout of the towns that I've created in previous steps.

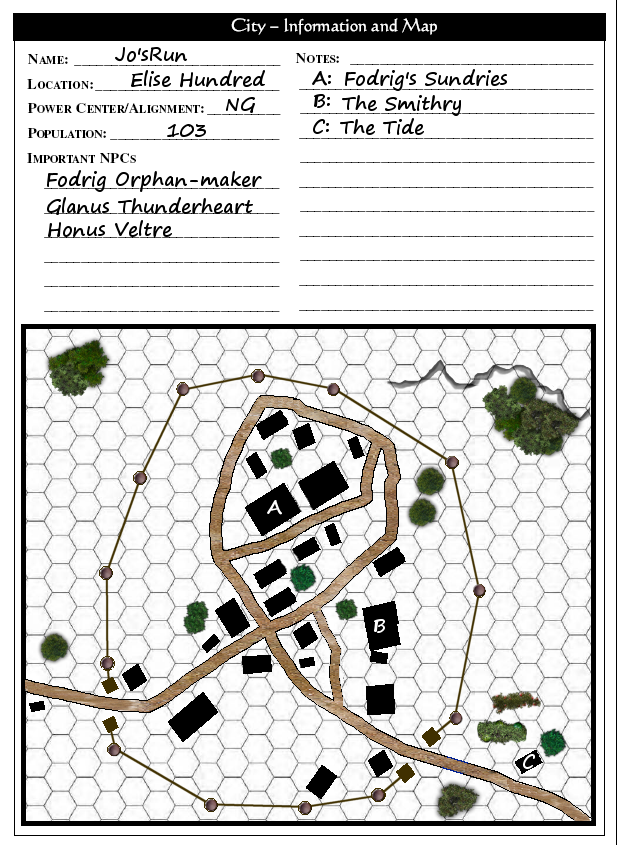
For Jo'sRun, I needed a simple frontier town (population of 109) that had a simplistic walled fortification. This could be used as either a base camp, or jump off location to other areas in the region. For this layout, I used RPG CityMap Generator and after adjusting all the settings, it produced a solid layout I envisioned on the 2nd try. I dropped in the 3 main shops in town, and called it complete.

Herein is the finished city sheet:
Image

22: Devise basic monster backgrounds for regions

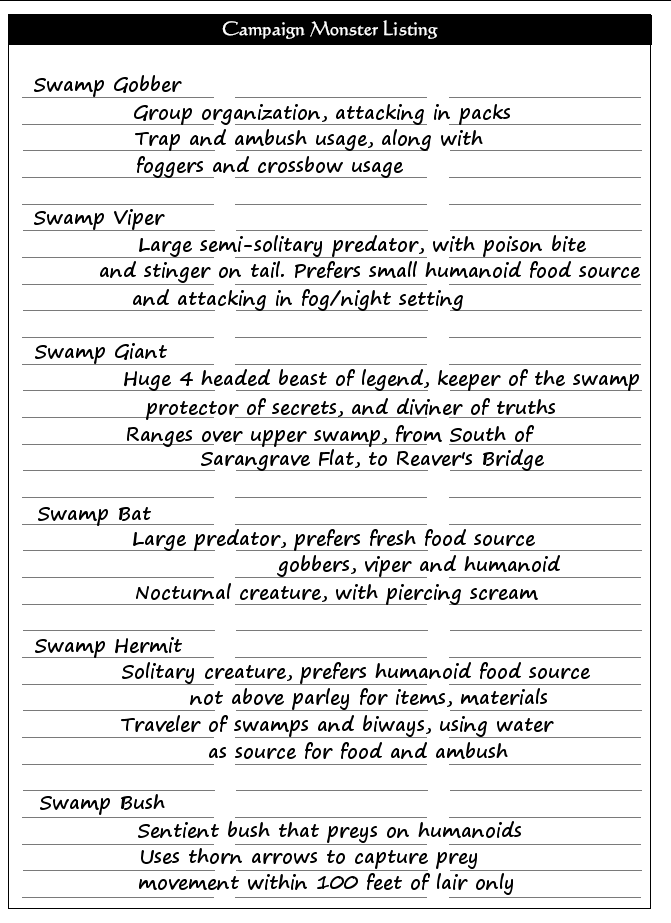
Next I developed a group of monsters for each region of the original map. Some have just a very basic framework, while others have complete stats and background.

For the Corvis Swamp region, I created the following information:
Image

Tuesday, April 12, 2011

Non-Traditional Sandbox Design 9

20: Finish Monthly Calendar (if applicable)

The Monthly Calendar is next on our list. First I decide on the amount of days per month, the length of special seasonal events, if a leap year would be used, and how many moons there are. If moons exist, I set their rotational period.

I lean towards a traditional 30 day calendar for ease of use, but then thought this would be an opportunity to use 28 days and extend each of the 4 major seasonal events to a 6 day period. As an additional bonus, I went with a Leap year, once every 4 years that would be added onto the Summer Solstice.

I employ WeatherMaster, and create a custom world, with all of my info, including the two moons of Isolde; Bast and Nephthys, and their rotational cycles of 29.5 and 20.5 days respectively. By offsetting these cycles, I come up with some very interesting phenomena. A couple are noted here:

On Savor 28 there is a double full moon, known as "The Eyes of Osiris".
On Nuzyael 15 there is a double dark of the moon, known as "Set's Reprieve".

NOTE:
Prior to a session, I'll generate 1 or 2 months worth of weather, moon phases, and any other data I may need.

Herein is the finished Isolde Calendar - Top:
 Herein is the finished Isolde Calendar - Bottom:

Non-Traditional Sandbox Design 8

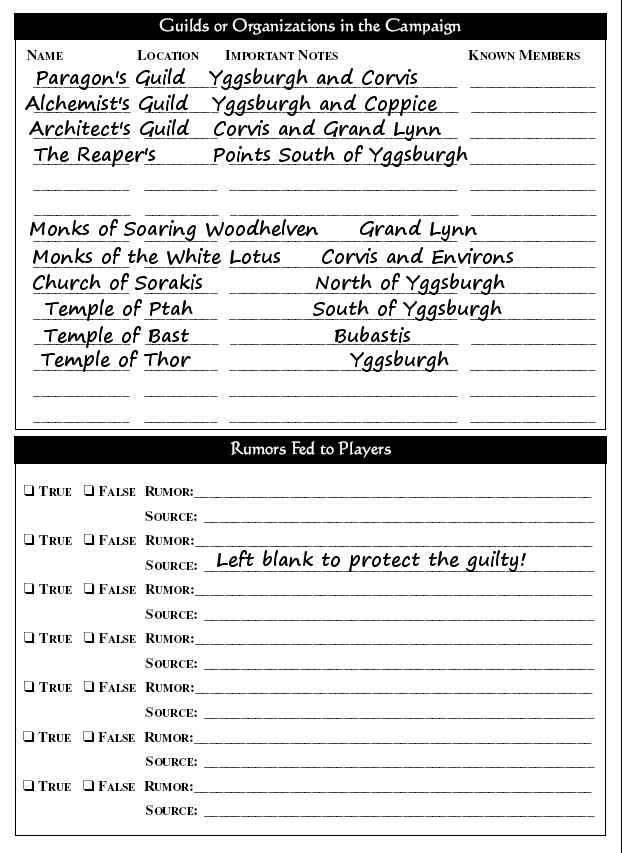
18: Create Guilds and Organizations in the Campaign

At this point its time to create the guilds and organizations that will be central in your campaign. The guilds are really just a way to present new ideas/concepts to your world, and by creating them as a guild, if they prove to be unbalanced during play, its easy enough to explain their change and/or disappearance due to other Guild's reactions to their inner workings.

The Organizations on the other hand may have minor, or major impact on the extended play in your world, so careful thought is needed not to overpower the proceedings early on. Within these organizations you may well find a truly nefarious character or organization that becomes the parties nemesis. I will stress at this point, unless you have a nemesis already fully designed, its best to see where the players go, and not "force" them onto a path where they meet this particular NPC - let the PC's lead the way and plan accordingly.

For this step, I created 4 guilds (in addition to existing ones) that might prove to be of aid to the party. Since my campaign uses gem stones in a more magical sense, introducing the Paragon Guild into the campaign was a consideration I leaned towards early on.

I initially created 6 organizations, of which most have some religious tie. Others are much more benign in their design at the onset, and may be developed further down the road.

Herein is the finished Guild/Organization sheet:
Image

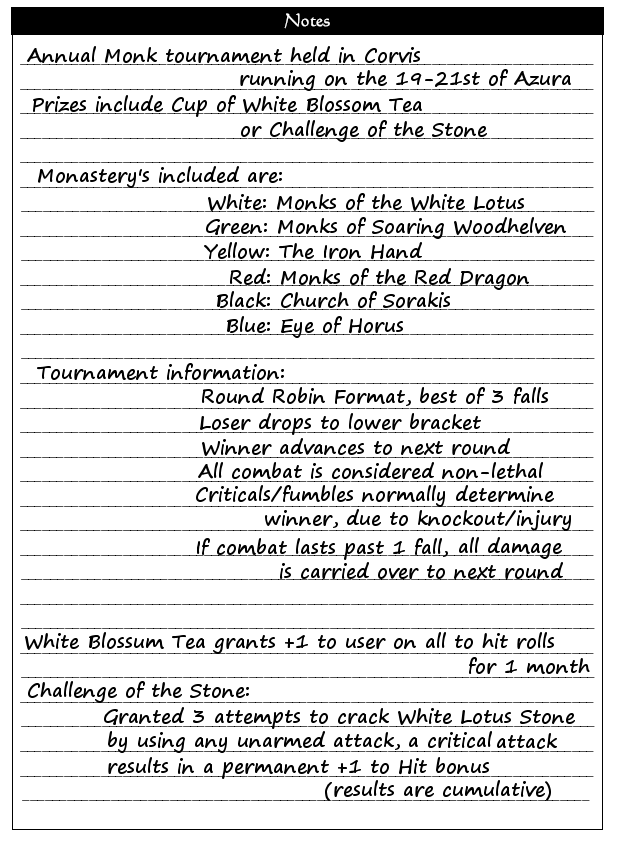
19: Lay out detailed notes for special events (if applicable)

This section is for some detailed notes on special events, tournaments or places the PC's may encounter/travel to.

In my case, 3 of the players wanted to create 1st level Monks, yet all three were not sure how long they would survive in the new campaign. Once they were on their way, one idea I had was to create a tournament to entertain and give them a chance to do battle in non-lethal combat while presenting them with a chance to role-play specific attacks. So on the fly I designed a round robin style tournament, and created a quick and dirty combat system. When they arrived at Corvis and spent the night, the next morn they awoke to flyers all around town that spoke of this tournamnet.

1 of the players named each of his attacks, so before the die was rolled for initiative, he would scream out "Flying Tiger Claw" then we'd roll for the advantage. The other 2 quickly picked up on this and hammed it up, coming up with phrases suited to their players style.

I created a 16 monk bracket, and rolled for the NPC matchups. All in all, the final pitted 2 of the players against each other, and everyone had a grand time. The 4th player at the table was so enamored with the fighting styles, he created a monk during the session, and got him in on the action.

This is but one example of a detailed notes section, so herein is the finished sheet:
Image

Non-Traditional Sandbox Design 7

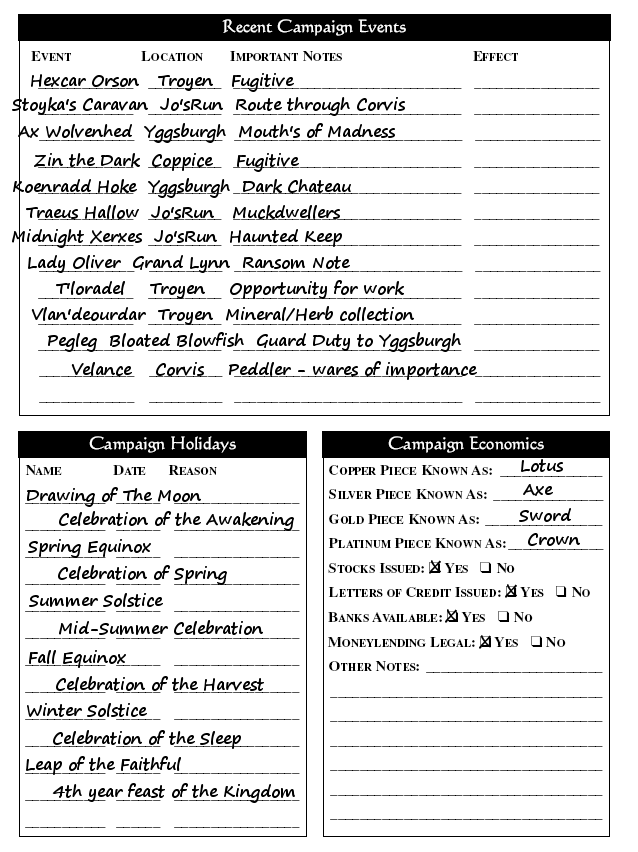
16: Fill out Campaign Events, Holidays, and Specifics for Banking (if applicable)

Next was to pull many of the pieces together from previous steps. Plot points that were originally designed to aid the players were added to the Campaign Events, along with notes where needed. The major Holidays were added including notes for clarity, and the coin names were dropped in, while I finished out the banking section.

Herein is the finished Campaign Events sheet:
Image

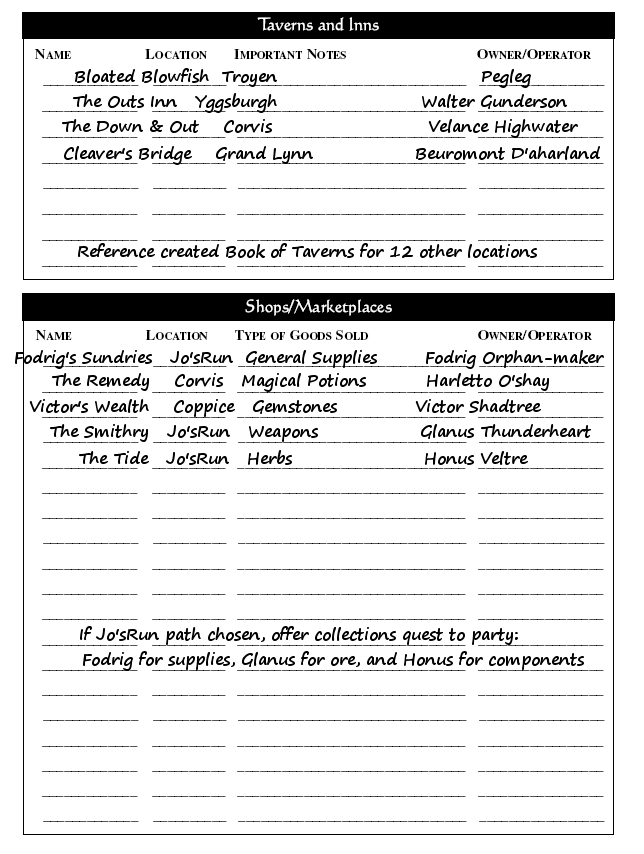
17: Create Taverns and Shops of interest, to drive Plot Points

One of my favorite steps is laying out the general details of each Tavern/Inn - i.e., it's name, location, and owner. Along with this I created a few noteworthy general shops that would also fuel the central plots I had created in previous steps.

NOTE:
I would like to stress this point here. The reason for NOT doing all this work is so you aren't bogged down by the idea of the size of the world on the front end. Again, we're not dealing with massive detail here, just a basic outline to focus our gaming session. Details, along with maps, layouts of each building can be created once the player's lean towards that plot point. IF they don't follow a particular path, then there is no reason to give yourself extra work, unless your really in love with a specific place/setting etc.

Herein is the finished Campaign Taverns/Shops sheet:
Image

Non-Traditional Sandbox Design 6

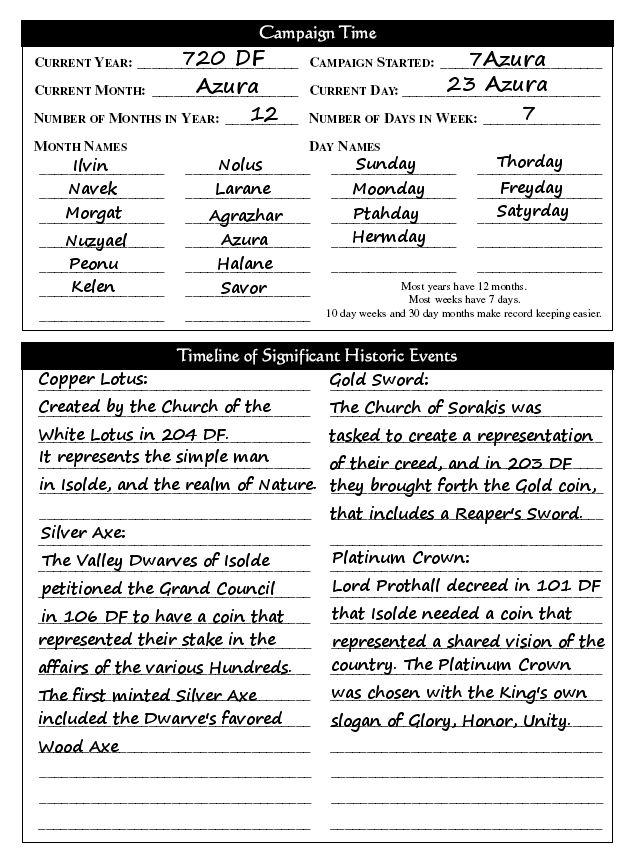
14: Fill out the Campaign Time line, including days/months of the year.

Here I fill out the base time line sheet, starting day, and writing down the months of the year and days of the week taken from step 13. The bottom section of this sheet I used to give origin dates for the coins of the realms, and their creators with a bit of info.

NOTE:
At this point I'm not worried about massive amounts of details, just trying to cover all my essential bases so that the world has a solid foundation. Later on I can go back and add in more details for various events during the gaming session.

Herein is the Campaign Time sheet:
Image

15: Create Coins for the Realms, based on input from previous steps

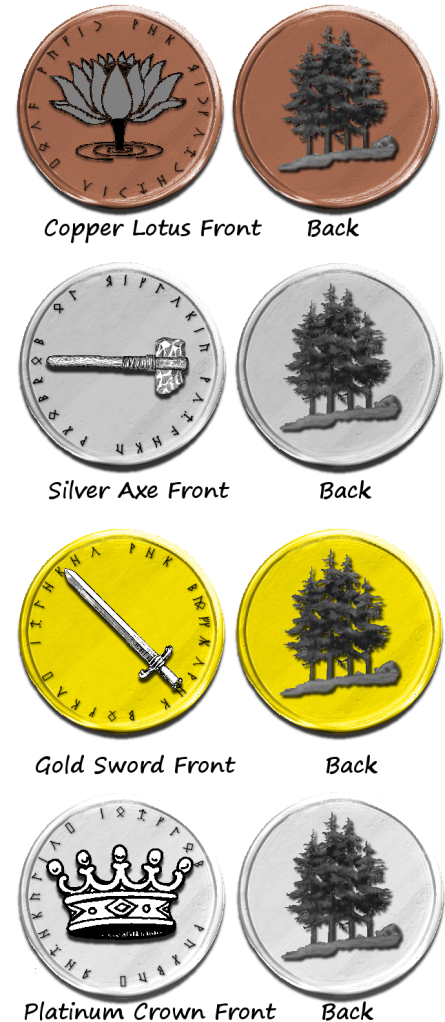
I wanted ease of use over some detailed design, something that the players "could" use if they wished, and decided that 4 large points of interest in the map design process would fuel each coin's history. Hence, the Church of Sorakis claimed the Gold Sword, the Valley Dwarves the Silver Axe, the Monastery the Copper Lotus, and the Royal Family the Platinum Crown.

Once I decided on a design for each "head", I wanted Latin to be central on the coins, yet hidden under the guise of a Harnic Rune. Lastly I pondered what to use on the "tail" or reverse side of each coin. I could have 4 individual designs, front and back, but once I took another look at the Giant Trees at Grand Lynn, it was an easy choice to include a simple Grove of Trees as a single point of continuity for all the coins.

Herein are the finished coins of the realms:
Image

Non-Traditional Sandbox Design 5

13: Create Calendar, and holiday/events of note.

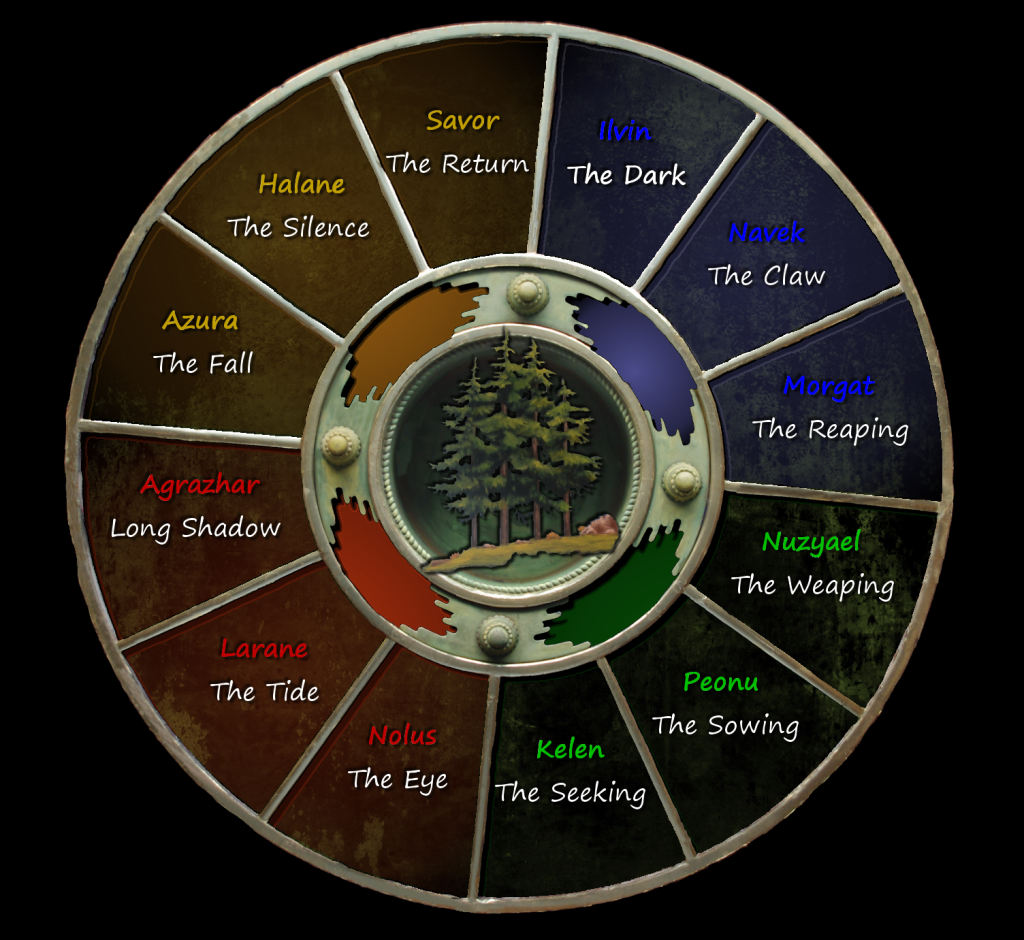
Each month has 30 days, with 5 special events throughout the year. Equinox, Solstice and Drawing are major days that the people look forward to throughout the year, and are known as markers for fairs, tournaments and feasts. Leap of the Faithful happens but once every 4 years, and is a day that the commoners may speak openly with their leaders/kings, and major tournaments are held on this day.

As for names of each month, I wanted to pay tribute to Harn by using their Month names, and adding in my own common names that the people of Isolde would use. The Gregorian references are only included here for clarity.

Drawing of The Moon

Janus: Ilvin: The Dark
Februs: Navek: The Claw
March: Morgat: The Reaping

Spring Equinox

Aprus: Nuzyael: The Weaping
May: Peonu: The Sowing
Junus: Kelen: The Seeking

Summer Solstice

Julus: Nolus: The Eye
Augus: Larane: The Tide
Septem: Agrazhar: Long Shadow

Fall Equinox

Octob: Azura: The Fall
Novem: Halane: The Silence
Decem: Savor: The Return

Winter Solstice
Leap of the Faithful (Once every 4 years)

I wanted to create a circular calendar, that would quickly associate each 3 month section with a color reminiscent of that season. Included herein is the finished Isolde Calendar:

Image

Monday, April 11, 2011

Non-Traditional Sandbox Design 4

11: Choose Plots (use Custom or Commercial modules as needed)
I had went through a large selection of modules, both home brew and existing commercial products, and found some that would fit the continent, and more importantly the levels of the players. Since we were starting with Level 1 characters, I leaned towards a few that would be considered campaign scenarios in their own right, i.e., covering a range of levels from 1 through 5 and 3 though 7. I also chose a few so called One Offs, being short enough to get the players feet wet if they chose that specific route as they explored the world. A few notables are listed here:

Castle Zagyg (City of Yggsburgh)
Witch-fire Trilogy (City of Corvis)

NOTE:
If your interested in short adventures to be included in your own sand box style game, I'd recommend searching various AD&D websites for adventures created and posted to the files/downloads section. There is a literal plethora of great adventures waiting to be used, and or added into any campaign. I've a folder on an external hard drive filled with such items - and they always serve as inspiration when needed.

12: Create a series of Adventure Hooks
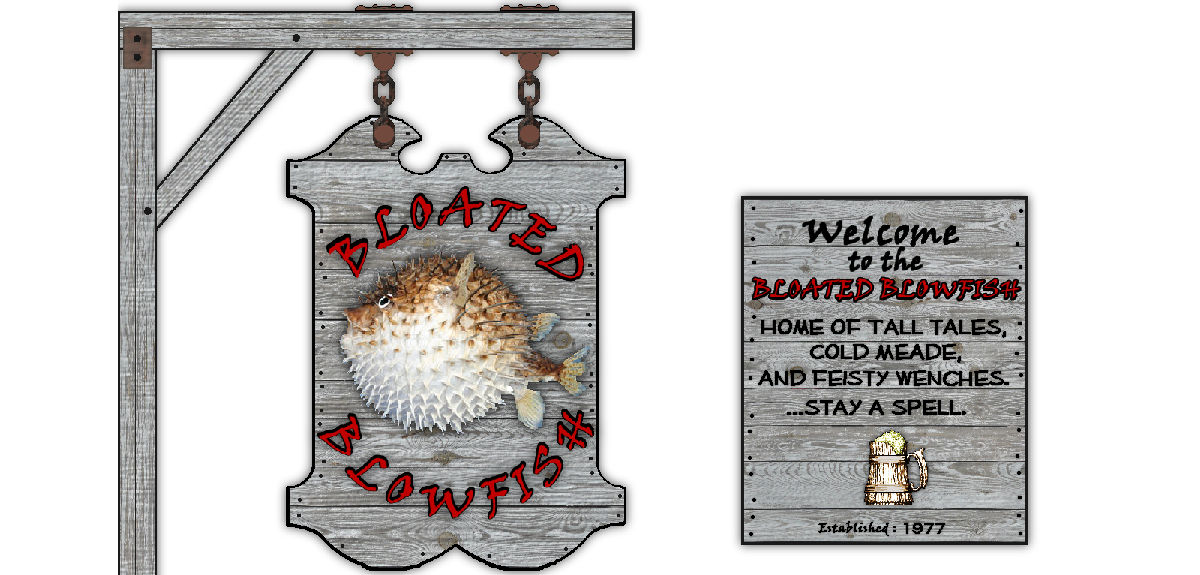
Since the campaign would be starting at Troyen, the home of the Bloated Blowfish, I needed to devise a series of plots that would stand as possible paths to give the players a range of things to do. These were set up not as "must occur" events, but rather would stand if the party couldn't decide on a course of action.

Using a few of the module ideas I listed above in step 11, I started fleshing out where each module would be located, and fitting all the pieces together. I decided to focus on 12 initial adventure hooks and the breakdown was as follows:

6 Wanted Poster
2 Help Wanted Signs
3 NPC Interactions
1 Note

The Note would be given to one of the players as part of his background story, while the 3 NPC interactions would be spread out through the small town of Troyen and at the Bloated Blowfish. One of the Help Wanted signs was the traditional Guard the Caravan, while another was of the "Find My Missing Child" variety. The Wanted signs varied from "Dead or Alive" to "Reward for Capture". The posters and signs were displayed on a literal "Work Board" that was set up in the corner of the gaming room prior to the session beginning.

NOTE:
During our session, and over the course of an hour or so, the players ambled over to the board, looking at items and then conferring with each other. Each player had a vote, and after some very interesting discussions, they decided the caravan would be the best way to start. So the journey began, first stopping off at Corvis, and eventually arriving to Jo'sRun.

Non-Traditional Sandbox Design 3


6: Have Players name important landmarks.
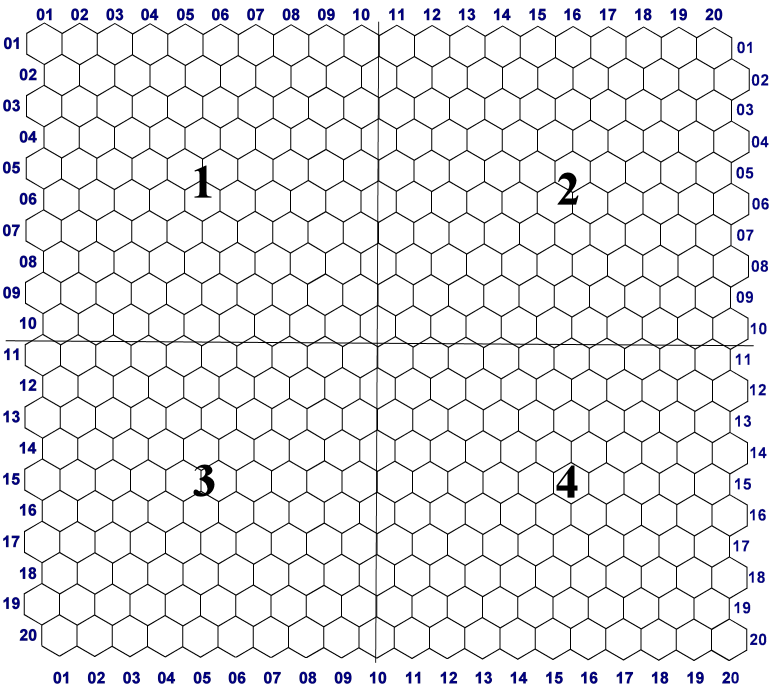
The entire map is 20 X 20 hexes, and each hex equals 2 miles. I took the county map and lightly marked it into 4 regions, each made up of a 10 X 10 hex segments. I quickly numbered these 1-10 both north and south so I'd have a quick grid to cross reference for this step.

Included herein is a copy of my hex grid, with numbers and sections in place - for reference:

Image

During our pregame session where a few players were rolling characters, I required each to come up with some landmarks that perhaps their character was familiar with (as part of their back story – or something they may have seen in their travels). Then, as each was named, I had them roll a D4, then 2 D10 to give me the exact spot on the map this special landmark fell. Landmarks listed below:

Swamp
Sinkholes
Deadland
Tomb
Cave
Ruin
Arid Planes
Geyser
Giant Tree
Swamp
Waterfall

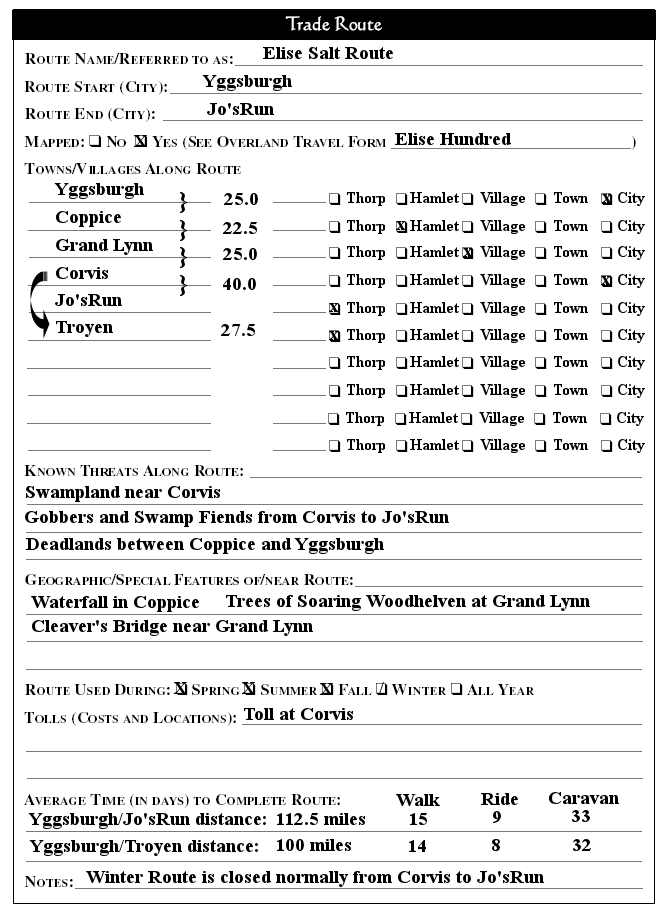
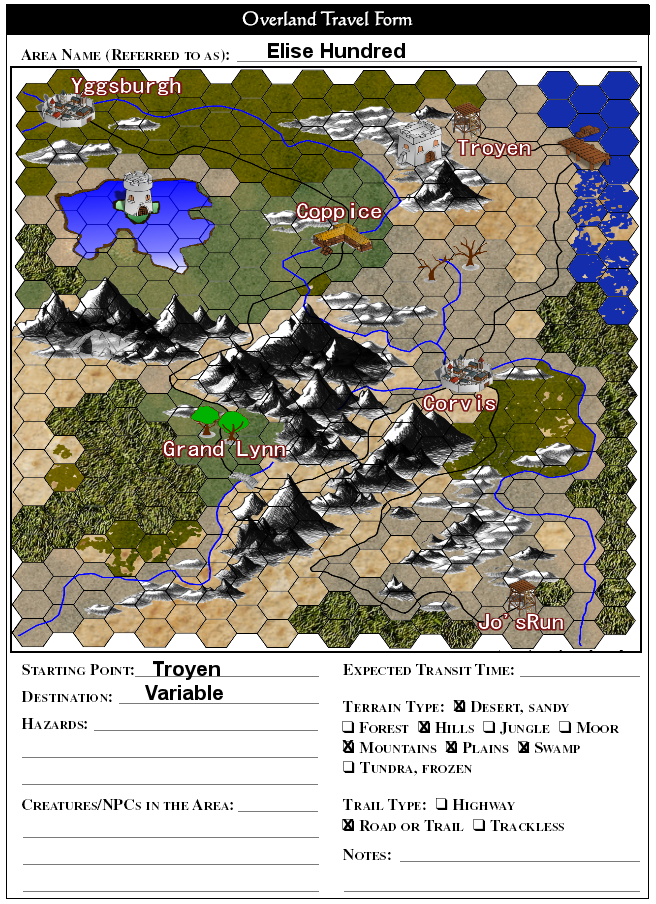
NOTE: During this creation phase, one player said Giant Trees, and rolled the placement. It dropped the trees directly onto Grand Lynn, and thus in a moment the Trees of Soaring Woodhelvin were born. (Covenant place of fame). Other interesting points – all rolled at random were the waterfall placed at Coppice, a point coming down out of the Crestfallen Mountains, a Tomb on island in the middle of a lake just South of Yggsburgh, and the Geysers of Sarangrave Flat (Covenant place of fame).

All told, I really enjoyed this, and later on the player whom had said Swamp stated in character during their first foray versus a tough collection of Swamp Gobbers “Why oh why did I mention swamp..Bleh!”. That made my day.

Included herein is a copy of the completed Trade Route, with features added by the players:

Image

7: Add Mountain and Hill features.
I dropped in a range of mountains and hills wrapping them around and through the trade route, taking special care to leave room for other “special landmarks” not added by the players. I stuck with a basic layout here, using a D6 for each side of a standard hex when I needed to make a decision about the direction a feature would run.

8: Define Lakes (if applicable).
I rolled a set of D6 to help create the lake outline. In directions leading towards rivers I placed a 1 hex beginning line to aid in remembering to make connections (where needed).

9: Define River by random roll
Knowing that Yggsburgh and Corvis needed 3 rivers to properly exist, these two features were drawn one hex away from both cities. In addition, a major landmark, a waterfall at Coppice required a major river above and below it. Lastly, the lake river inlet was created.

From there, I had the players roll D6 to plot the rivers, ensuring they hooked up, although I was pleasantly surprised how easy and natural the river systems turned out.

10: Add traditional vegetation features.
Once the mountains, hills, river and lakes were added, the final step was to draw in traditional geographic features. These included forest, plain, grassland and ensuring that each feature blended well with the one near it.

Included herein is a finished copy of the Elise Hundred Map:

Image

Non-Traditional Sandbox Design 2

Hundred Design (County for the uninitiated)
I had two pieces of the puzzle in place, but had decided from the onset that whatever campaign I ran, it would be based on an original sandbox design that I had used in 1978. I'll go into some detail here to address my creation and steps needed to accomplish those goals for yourself. Items I pulled together from existing sources to aid me in creating this continent are listed below:

Mystic Eye Games Campaign Planner Collection
Ronin Arts Fantasy Handouts Collection

In my version of the term “sandbox style game” – I create things from a micro scale outward. That is, all I start with is a rough outline of one county (hundred) on my continent, and a single point of interest – in this case the Bloated Blowfish Tavern. Because I'm working from the micro scale outward, I'm essentially discovering the world with my players as they adventure. It's a bit more back end work for me, but it also allows me to shape the fringes of the world, while giving the player more control over the world in which they live.

1: Create back story and rough outline of the county map.
I started with a region where my tavern, the Bloated Blowfish would be based. The Blowfish began on a small peninsula island off the coast of the continent of Isolde, near Lake Elise. Up on the hill above sits Crestop, a large castle that for 200 years stood as a home to many souls and a regent to the lands. Then Crestop's neighboring mountain collapsed, blocking off the salt and river routes and the entire region changed.

Once the arduous journey was made by the son of the King to the region of Crestfallen, Lord Reginald quickly decided something had to be done. In the early 6th century, a few of the old routes were reconnected, and with the help of the Valley Dwarves of Elden-Way, some semblance of normality returned to this region. It was decided that combining the existing castle and tavern into one large conglomerate might be able to take advantage of the regions restored status. From there, the tavern quickly gained notoriety for being a crossroads haven for adventures, and folks searching for a purpose in life.

2: Create a list of towns central to plot points (to be developed in future steps).
City: Yggsburgh - Northwest Corner
Town: Corvis - Eastern Central locale
Village: Coppice - closest town to Yggsburgh in this county
Village: Grand Lynn - central location, middle of map
Thorp: Troyen - Starting point, near Lake Elise – North East corner
Fife: Jo'sRun - Southwest corner

Note: The towns in bold already exist in print from other published sources.

3: Create a trade route and list its principle Start and End points.
A. The trade route runs from Yggsburgh to Jo'sRun.
B. There is a toll to be paid at Corvis -which sits as a central point on the route. Going North takes one to to Troyen, home of Crestfallen and the Bloated Blowfish.
C. South from Corvis leads to Jo'sRun.
D. West from Corvis leads to Grand Lynn, and further on to principalities of Coppice.
E. From Coppice the trail opens outward and down to the 3 rivers junction at Yggsburgh.

4: Place Towns on map.
I then placed each town on the map, in the positions I created in step 3.

5: Place Trade Route on map, connecting the principle locations from step 3.
I then created the Trade Route, connecting the principle towns along it as created in step 3.

NOTE: It's critical not to do anything else at this point – since the players will be directly involved in the creation of, and the playing in the world. Resistance, in this case, is not futile!

Non-Traditional Sandbox Design

Campaign Background

Over the last few months I had been gathering steam on my own campaign setting, which would become a blend of existing information, maps, places, NPCs, from the last 35 years of playing and Dming 1st Edition AD&D. In that time, I investigated a slew of various options and systems, some of which sang in my ear for a short time, while others were quickly tossed to the side because they lacked ingenuity or anything I could use. Then, last summer I joined up with a local group of gamers known as the Foaming Flagons – who it turned out loved the classics of the genre; from Traveller and Call of Cthulhu to OD&D and the Forgotten Realms – these guys were like mirror images of myself.

Once it was determined I passed muster (and don't get me started on that whole “introduction to a new group/blending in phase – I could write a book) the question eventually came up as to what I wanted to run.

I had, and still consider MERP to be one of my favorite settings. As a certified geek of Tolkien, this system really contains everything one could want for the setting, and there is enough historical data (read – existing modules and published material) to give any confident DM and group a lifetime worth of imagination and excitement. The issue however came down to the character generation and the ideology that if I were going to run this the ring could not exist. So, MERP was pushed aside.

The Forgotten Realms. I'd be remiss not to mention my considerations for this setting, given it's legendary status at our table (1E) and how well known the land is. In many regards I know this world better than the one I live in, so Faerun will be used in part.

Next I turned to the most amazing setting that I've ever seen. Detail, maps to die for, a fevered group of fans whom create their own “fanon” and count them 2 companies developing material 28 years after the system's introduction. This means there is enough meat and (lack of potatoes) to fill any palette. (that is a pun for the unknowing – for somewhere in the annals of this world it became a fairy tale that potatoes don't exist)

Yes, I'm speaking of Harn. Most people talk about the maps, but for me its the little details in this world that absolutely slay me. From creating and running your own manor, to the misunderstanding that many have that Harn is a magic weak world. How inaccurate that is – for it is magic-rare. Odds are in your adventures you will encounter entire villages that have never seen an iota of magic in their entire life. The Shek-Pvar (the mages) tend to keep a stern eye on any outward displays of magic but the way I look at this system is that a PC is a hero, special in some regard, capable of retaining spell energy, or exceptional of heart. So, Harn's island has been dropped onto the globe – to sit alongside Faerun.

Lastly, I wanted to incorporate places and perhaps even NPCs from my favorite set of books and author; The Chronicles of Thomas Covenant by Stephen R. Donaldson. This set of works has inspired me like no other, and I've had the great fortune to meet him on several occasions.

Campaign History: Coins of the Realms 2

~~Background 1978 - January 21 ~~

After careful thought, I had decided early on that any coin in the Realms would include the same back design, to represent Isolde and to cut down on production costs. Many designs were considered, but I kept coming back to the one feature that makes Isolde, well Isolde - the Giant Trees.

The Monks of Soaring Woodhelven have 2 huge specimens, and there are other locations throughout Isolde that have some smaller cousins, if 400 feet is small. A single tree seemed to sparse for my taste, while a grove of trees better represented the wildness and serenity that forests present.


Cheers,

Sunday, April 10, 2011

Campaign History: Coins of the Realms

~~Background 1978 - January 21 ~~


My next task was to create a set of coins that represented the various cardinal powers of Isolde, while also sharing my love for all things Latin. It would be 5 more years before Harn came along, but I was already envisioning a world that was based on Medieval Europe, and had a touch of Tolkien. I quickly decided to use Latin as my choice of slogan, and hid each under the guise of a Dwarven - later to be Harnic Rune.


Created by the Church of the White Lotus in 204 DF, the Copper Lotus represents the simple man in Isolde, and the realm of Nature. A classic Harnic font overlays the Latin phrase:

Consensio quod Pacis per Vis
Harmony and Peace with Nature


The Valley Dwarves of Isolde petitioned the Grand Council in 106 DF to have a coin that represented their stake in the affairs of the various Hundreds. The first minted Silver Axe included the Dwarve's favored Wood Axe encircled by the Latin phrase:

Pondera Plumbum ut Victoria
Balance Leads to Victory


The Church of Sorakis was tasked to create a representation of their creed, and in 203 DF they brought forth the Gold Sword. It includes a Reaper's Sword, encircled by the Latin phrase:

Ago per Mucro
Live by the Sword


Lord Prothall decreed in 101 DF that Isolde needed a coin that represented a shared vision of the country, and tasked many artisans. The Platinum Crown was chosen with the King's own slogan of Glory, Honor, Unity surrounded in Harnic Runes:

Palma , Veneratio , Iunctum
Glory, Honor, Unity

Saturday, April 9, 2011

DM Screen Collage and Player Handbook's Images

 Archived for 1979 - in reference to my original DM Screen


For some time I've been working on an upgrade to the central collage of the DM Screen from 1979. This latest effort was 35 hours of editing, matching up segments and attempting to capture the flavor of the original. Is it perfect?

Nah, probably won't ever be, but hopefully for those that wish to create their own DM screen, it'll be a nice upgrade. I've uploaded this in 2 parts. Left side: 


Right side:


Lastly, I've finished the editing of a larger Original Player's Handbook front cover.

DM Screen Source Images

Archived for 1979 - in reference to my original DM Screen

For some time, and like many DM's, I've been searching for the ultimate Dungeon Master Screen. The original 1979 version remains the de-facto version with enough information (and art for the player) to satisfy all my old school desires. So a while back I discovered a fantastic DM Screen that has everything the original had, and more. Over at Dragonsfoot, member


DM Screen

In any case, for those that actually follow this blog, I've recently edited all of the images found in his original thread's includeds images. Since they were not included in the pdf file I thought this might help finish this fantastic addition to your gaming table.


Cheers,

Campaign History: Outdoor Setting

~~Background 1978 - January 3 ~~


In redesigning my original maps, I discovered I had forgot a section of the wilderness. This is for a region of the Elise Hundred, that focuses on a long forgotten tomb of a crazed alchemist/trickster. This was done in about 10 minutes with MapTools.

Campaign History: Librams and Tomes

One of the first things I wanted to focus on was the creation of some special books that could aid players if they found them. For each book that has a positive effect on a player's stat, there is indeed a singular volume of each that grants the opposite effect, i.e., a book that is cursed.


Orpusl of the Sword:
Black leather book, with Longsword across cover. 

Corded binding with silver pages.
Weight: 3 lb.

This treatise contains expert advice and instruction in the art of sword and shield. Each page contains detailed accounts of combat techniques and sketches intended to aid the reader. A fighter, paladin or ranger who spends one week studying the manual gains a +1 inherent bonus to Strength and experience points sufficient to place him or her halfway into the next level of experience. Except as indicated above, the writing in a Orpusl of the Sword can’t be distinguished from any other book until perused. Once read, the book vanishes, never to be seen again, nor can the same character ever benefit from reading a similar tome a second time.


Folio of the Hand:
Soft leather book, with White Lotus on cover. 

Corded binding with copper pages.
Weight: 4 lb.

This treatise contains expert advice and instruction in the art of unarmed combat. Each page contains detailed accounts of combat techniques and sketches intended to aid the reader. A monk who spends one week studying the manual gains a +1 inherent bonus to Constitution and experience points sufficient to place him or her halfway into the next level of experience. Except as indicated above, the writing in a Folio of the Hand can’t be distinguished from any other book until perused. Once read, the book vanishes, never to be seen again, nor can the same character ever benefit from reading a similar tome a second time.


Opuscule of the Bow:
Dark leather book, with Arrow on cover. 

Corded binding with bronze pages.
Weight: 4 lb.

This treatise contains expert advice and instruction in the art of bow and arrow. Each page contains detailed accounts of combat techniques and sketches intended to aid the reader. A ranger who spends one week studying the manual gains a +1 inherent bonus to Strength and experience points sufficient to place him or her halfway into the next level of experience. Except as indicated above, the writing in a Opuscule of the Bow can’t be distinguished from any other book until perused. Once read, the book vanishes, never to be seen again, nor can the same character ever benefit from reading a similar tome a second time.


Tome of The Eye:
Scored leather book, with pierced eye on cover. 

Corded binding with stained pages.
Weight: 5 lb.

This mystic book is of great value to illusionist and mages of good alignment (LG, NG, CG). Study of the work requires one week. Upon completion, the caster gains a +1 inherent bonus to their Intelligence and experience points sufficient to place him or her halfway into the next level of experience. Except as indicated above, the writing in the Tome of the Eye can’t be distinguished from any other book until perused. Once read, the book vanishes, never to be seen again, nor can the same character ever benefit from reading a similar tome a second time.


Edifice of The Stars:
White leather book, with falling star on cover. 

Corded binding with faded blue pages.
Weight: 6 lb.

This mystic book is of great value to clerics of good alignment (LG, NG, CG). Study of the work requires one week. Upon completion, the cleric gains a +1 inherent bonus to their Wisdom and experience points sufficient to place him or her halfway into the next level of experience. Except as indicated above, the writing in the Edifice of the Stars can’t be distinguished from any other book until perused. Once read, the book vanishes, never to be seen again, nor can the same character ever benefit from reading a similar tome a second time.


Ordunam of the Tree:
Supple leather book, with forest on cover. 

Corded binding with green pages.
Weight: 7 lb.

This mystic book is of great value to druids. Study of the work requires one week. Upon completion, the druid gains a +1 inherent bonus to their Wisdom and experience points sufficient to place him or her halfway into the next level of experience. Except as indicated above, the writing in the Ordunam of the Tree can’t be distinguished from any other book until perused. Once read, the book vanishes, never to be seen again, nor can the same character ever benefit from reading a similar tome a second time.


Vespers of the Mind:
Solid slate book, barren cover. 

Heavy Corded binding.
Weight: 12 lb.

This heavy book contains instruction on improving memory, logic and lore. Any class may read this tome and by doing so, which takes a total of 48 hours over a minimum of six days, they gain an inherent bonus of from +1 to +4 to their Intelligence score. In addition, the reader will earn an extra 10% experience when attaining a new level. Once read, the book vanishes, never to be seen again, nor can the same character ever benefit from reading a similar tome a second time.


Opus of Grandeur:
Heavy wood, with golden swirls on cover. 
Silk corded binding with white pages.
Weight 10 lb.

This large ponderous book gives a detailed account of the life of Haerium Ost'Versuer a master of suggestion and persuasion. If anyone reads this book, which takes a total of 48 hours over a minimum of six days, they gain an inherent bonus of from +1 to +4 to their Charisma score. Once read, the book vanishes, never to be seen again, nor can the same character ever benefit from reading a similar tome a second time.


Libram of Mentality:
Heavy wood, with silver swirls on cover. 

Satin corded binding with black pages.
Weight 8 lb.

This large ponderous book gives a detailed account of Men-Ptah, a master of instinct and perception. If anyone reads this book, which takes a total of 48 hours over a minimum of six days, they gains an inherent bonus of from +1 to +4 to their Wisdom score. Once read, the book vanishes, never to be seen again, nor can the same character ever benefit from reading a similar tome a second time.
Campaign History: Visions of the MageBone

Archmage Malachai Vision once wrote that: "nothing is more pleasing to my perverse sense of nature than to hide my property in ways that few would ever discover. Part of that ideology comes from the concept of hindering a party that has discovered a ancient tomb. Whilst the players are investigating it, they happen across a room bereft of anything but a couple coins and simply move on, ignoring the skeleton or parts of laying haphazardly around."


"Thus, over time, I developed a complex magic process to effect the bones on a subtle scale, and to allow me to place potions and even scrolls inside it".

"Any bone will do, from the size of a halfling up to even a great wyrm. However the amount of marrow that the bone has will greatly effect the amount of liquid that can be placed inside once the arcane magic has been woven into it. I lean towards human size because; of their immediate access, and they are the most common that are found in crypts/dungeons. However, for the curious, it isn't above my nature to endeavor to collect the bones of dwarves and elves, so that they too can be placed into deep dungeons where they may well have lived".

Normal bone with marrow intact

"The process takes seven days, and the bone must not have been shattered nor broken in half. Once it passes that inspection, the marrow is drawn out by using the spell Marrow Dust. A small canticle of little consequence that when cast changes the marrow to dust, and can be quickly removed. The double benefit of this spell is the bone can be quickly shaken in full light, and if any dust falls off the bone, then a mage will know the bone has a small hole or crack that needs to be filled. The dust is collected and used in step four".

Normal bone with marrow removed


"Once the bone has had the marrow removed, the next step is to prepare the sealing magic. This spell, known as Marrow Weld, will in effect fill any small gaps/cracks or holes found after Marrow Dust has been cast. It creates a small inner liner, thus protecting any liquid or scroll that is placed inside".

Normal bone - with seal in place

"Next, a stopper needs to be created that will not only serve as a seal for the top, but also will allow the bone to pass normal inspection. This uses the spell Marrow Seal to create a small cut around one end of the bone, where the liquid can be added. On the human femur, this area is known as the Head".

"A small rune is then carved onto this cut, and then the bone is placed in direct moonlight for 1 hour, and sprinkled with the marrow dust of the bone to seal the magic in place. After that, the bone may have any liquid other than acid placed in it or even a small scroll. Once satisfied with the new contents, the stopper is replaced and a magical word is spoken. This seals the bone, and completes the process".

MageBone, with Healing Potion


*****
To spot a MageBone, a roll vs. Intelligence at +4 must be made. If a player successfully identifies a MageBone, they'll notice a small rune carved in the bone at one end. By tracing the rune, the endcap shifts ever so slightly and may be removed to reveal the contents within. Failure denotes a simple weathered bone.

Other varieties require a phrase, a spell component, a knock spell and even a drop of blood to open.

1977 December - The Muckdweller

~~Background 1977 - December 27 ~~

I had this idea for a dark place, filled with a bit of history, and one of my favorite gaming elements - a maze. I had the opportunity to walk a real maze near my Aunt and Uncle's house in Virginia earlier that summer and was blown away by the experience. Thus "The Muckdweller" was born...

This adventure is based on the tragic loss of four children whom disappeared during the midst of a summer festival near Jo'srun. After a few weeks of searching a sense of hopelessness has fallen on the town but a hermit, living in an abandoned complex was suspected of the crime and a few brave locals volunteered to go bring him in for questioning. They were never seen again.

As time passed, and as local legends tend to do, the tale of the Muckdweller grew, and a woeful song whispered on the dark of the moon was born:

"From hill ta hill and vale to vale, no sound replies,
barren and dark deep in the muck, listen to the lies
Four small souls taken away, deep in the night
Lost and not forgotten, hope they yet fight
Old dark hermit deep in the muck, leave us alone
Dark night of grace, filled with woe, how shall we atone"

*****
NOTE:
I'm trying out Maptools (available for free at http://www.rptools.net/) to redraw all of my original maps, and so far am finding it to be a solid tool, especially with the ability to add in my own designed elements. Maptools can be used for virtual tabletop games, but in this case, I 've been searching for a tool that I can quickly recreate interior maps with little fuss. This first map was done in 10 minutes.
*****

1977 December - The Muckdweller : Part 2

~~Background 1977 - December 27 ~~

Once the players started exploring the main section of the dungeon, I quickly discovered that Abe, Seth and Victor were very adept at solving the level. It wasn't meant to be a massive place, but when they decided to rest in the first pool room (after securing both sets of doors on either end of that part of the complex), I decided an expansion was needed. Thus "The Muckdweller: Level 2" was born...


1977 December - The Muckdweller : Notes

~~Background 1977 - December 28 ~~

I sat down to fill out the back story of The Muckdweller and quickly realized most of the work was already done - except for two small areas near the main entrance.

I wanted the adventure to include a large set of possible hooks, and hopefully expand outward into a full blown campaign that the players would want to live in and explore. Little did I know how this one small dungeon would lead to 27 years of adventuring in Indosel, and along the way I'd discover a hobby that would last me a lifetime.

Included below is a snippet of information from the longest active player, Robert:

"Where to start? Indosel was a place that we spent so much time in, it became a second home. 

One of my characters, a fighter by the name of Haran, went from a lowly first level to a full blown castle owner in five years and later became a Lord of Light. My favorite adventure entailed our busting into a Manor that had fallen into the hands of the Church of Sorakis during one of their "services" and rescuing two small children and a grown man. Turned out the priest's enslaved the unfortunate, selling the strong in the Swamps of Mear to the highest bidder and sacrificing the unwilling-to serve females to Sorakis". 

*****
Thus, here ends the backstory of The Muckweller ... for a bit.

1977 December - The Muckdweller : Part 3

~~Background 1977 - December 28 ~~

This area was originally designed after watching a small torrent of rain in the woods behind my Grandparent's house. The central theme was intended to give players a wide range of activities to accomplish, or be a quick and dirty muckup. It progressed quickly to a full fledged 3rd level.

Friday, April 1, 2011

Project X: Part 13

*****
Familiar
Version 1.2D (Shareware)
Red When Excited
Status: Inactive **
There have been 3 software programs developed for 1E through 4E on the market named Familiar. This is the earliest version, and is one of the most complete packages for character design I've had the pleasure to use. It is based on 2E, but with small changes it fits the 1E game very well. The key words here are flexibility, ease of use, and solid design. One of the high points is the way in which you interact with the various items/weapons etc. throughout the creation process. When its time to outfit a character, you first select the + sign on the weapons tab, which opens a context folder that has all the weapon types listed. then simply choose the folder that applies to your choice, and then click the "hand" that will be carrying this item. On, Two Handed, Off, Throwing and Firing are your choices here. Then you can choose proficiencies, in the same way.

Magic works the same way, with the added bonus that a mage has to buy a spellbook (you can override the cost here by simply clicking purchase anyway) then choose your spells. Open the book in the middle tab, assign the spell to the book (each book has 40 pages) then memorize the spell and it appears in the right tab.

Many of the features here are down right brilliant in concept and execution. In one example I've shown visually, I opened the treasure table, chose 1 of type M, then decided to add in Black Opal Dust with the gold pieces. I can already see making some unique treasure hordes, but more importantly this software gives life to my imagination. Something that I was not expecting, yet was a very pleasant surprise. Another excellent feature is the ability to create magical intelligent weapons. Add in special abilities, Ego, and really this is a solid way to quickly add your own items to the software.

Overall, this software is shareware, and while it isn't an "active" software title at the moment, I've placed an asterisk by the current status due to a possible deal being worked out between us so that access to the code would be given, thus making it available for interested parties to further develop and use. Stay tuned...

I can humbly say this is in my top 3 products I've reviewed for how well everything fits together, and how intuitive everything is. A ton of time was spent developing this product, and it shows. 2 thumbs, way up!


*****